Fast and Simple Whipped Feta with Spicy Honey Recipe
**Simple and Swift Whipped Feta with Spicy Honey Recipe**
Whipped feta with spicy honey is a scrumptious and adaptable dish that merges the rich, tangy flavors of feta cheese with the sweet and fiery essence of spicy honey. This recipe is ideal for a speedy appetizer, a tasty sandwich spread, or an intriguing enhancement to a cheese board. Here’s how to create this easy yet striking dish.
**Ingredients:**
– 8 oz (225g) block of feta cheese, crumbled
– 4 oz (115g) cream cheese, softened
– 2 tablespoons olive oil
– 1 tablespoon lemon juice
– 1 teaspoon lemon zest
– Salt and pepper to taste
**For the Spicy Honey:**
– 1/2 cup (120ml) honey
– 1-2 teaspoons red pepper flakes (adjust to your preference)
– 1 tablespoon apple cider vinegar
**Instructions:**
1. **Prepare the Whipped Feta:**
– In a food processor, mix the crumbled feta cheese and softened cream cheese. Process until the mixture is smooth and creamy.
– Incorporate the olive oil, lemon juice, and lemon zest into the mixture. Blend again until everything is thoroughly combined and the mixture is airy and fluffy.
– Season with salt and pepper according to your taste. Use caution with the salt, as feta can be quite salty.
2. **Make the Spicy Honey:**
– In a small saucepan, mix the honey and red pepper flakes. Heat over low heat, stirring periodically, until the honey is warmed and the flavors meld, around 5 minutes.
– Take off the heat and mix in the apple cider vinegar. Let the spicy honey cool slightly.
3. **Assemble and Serve:**
– Spoon the whipped feta into a serving bowl, creating a small indentation in the center.
– Drizzle the spicy honey over the whipped feta, allowing it to pool in the indentation and drip down the sides.
– Pair with warm pita bread, crispy baguette slices, or fresh vegetables for dipping.
**Tips:**
– For a creamier consistency, ensure the cream cheese is at room temperature before blending.
– Tailor the heat level in the spicy honey by adjusting the quantity of red pepper flakes.
– Store any remaining whipped feta in an airtight container in the fridge for up to three days. Gently reheat the spicy honey before serving.
This simple and swift whipped feta with spicy honey recipe is destined to become a favorite. Its blend of creamy, tangy, sweet, and spicy flavors makes it a standout dish for any event. Enjoy exploring this recipe and adding your own flair!
The Definitive Formula for Homemade Cinnamon Buns
# Soft and Tasty Cinnamon Rolls Recipe
This recipe for cinnamon rolls results in rolls that are soft and tasty. The tender dough is filled with sweet cinnamon sugar, rolled up, and baked to perfection. Finished with a cream cheese frosting, these rolls deliver the ideal bite!
## Overview
While they require a bit of time, homemade cinnamon rolls are simple to prepare, so don’t feel daunted by the yeast.
### Flavor
Tender, fluffy dough is filled with brown sugar and cinnamon for a sweet, gooey center and gently golden buttery edges.
### Recommended Tools
A stand mixer simplifies kneading, but the dough can also be combined by hand or in a bread machine.
### Yield
Produces 15 generously sized rolls, ideal for sharing.
### Serving Suggestions
Enjoy these for a special breakfast with complementary dishes like an overnight breakfast casserole.
### Freezing
Freeze baked rolls prior to frosting. Reheat them in the microwave for warm and soft cinnamon rolls anytime.
## Ingredient Notes
– **Yeast**: Make sure the yeast becomes foamy in step 2; otherwise, the buns won’t rise. Instant yeast has not been tested in this recipe.
– **Dairy**: Whole milk and butter contribute richness and keep the dough tender. If using salted butter, lower the salt in the dough.
– **All-purpose flour**: Employ the spoon and level technique to prevent dense rolls. Bread flour can be used for even softer rolls.
– **Cinnamon Sugar Filling**: The filling is a blend of brown sugar and ground cinnamon. Either dark or light brown sugar can be used.
## How to Make Cinnamon Rolls
1. **Proof the yeast**: Mix the yeast with warm water and sugar. The blend should become foamy.
2. **Prepare the dough**: Heat the milk and butter in a separate bowl. Incorporate the remaining dough ingredients, including the yeast mixture, and knead until smooth.
3. **Rise**: Place the dough in a warm area for about an hour or until it has doubled in size.
4. **Add filling**: Roll the dough into a rectangle, spread with butter, and dust with cinnamon and brown sugar. Re-roll the dough and slice it.
5. **Bake**: Arrange the rolls in a prepared baking pan and bake until golden brown.
Savor! Once the rolls are fully baked, allow them to cool before serving. Remember the cream cheese frosting!
### Pro Tips for Perfect Rolls
– Ensure all ingredients are at room temperature.
– If the yeast does not foam, substitute it with fresh yeast.
– Add flour gradually; using less flour helps achieve softer rolls.
– If your kitchen is cool, allow the dough to rise near a warm oven.
– Lightly cover the dough with a kitchen towel while it rises.
– If the rolls brown too quickly, loosely cover them with foil.
### Make Ahead Instructions
1. Cover the prepared cinnamon rolls in a greased 9×13-inch dish with plastic wrap and refrigerate for up to 24 hours.
2. When ready to bake, take the rolls out of the fridge and remove the plastic wrap. With the oven off, cover the rolls with a clean kitchen towel and place a bowl of very hot water in the oven for the first rise.
3. To bake, take the rolls out of the oven (leave the water inside) and preheat the oven to the recommended temperature. The hot water will create steam, keeping the rolls soft and fluffy during baking.
4. Bake according to the recipe instructions.
### Storage and Leftovers
– Store baked cinnamon rolls in an airtight container at room temperature for up to 2 days or refrigerate for up to 4 days.
– Microwave individual rolls for 10 to 15 seconds to soften.
– To freeze, omit the frosting, wrap baked and cooled rolls securely, and place them in the freezer for up to 2 months. Thaw at room temperature and frost just before serving.
### Nutrition Information (per roll)
– **Calories**: 398
– **Carbohydrates**: 57g
– **Protein**: 5g
– **Fat**: 17g
– **Saturated Fat**: 10g
– **Cholesterol**: 66mg
– **Sodium**: 141mg
– **Fiber**: 2g
– **Sugar**: 31g
Relish these cinnamon rolls for a cozy brunch or a special celebration!
Robust Chicken Parmesan Soup Recipe
Chicken Parmesan Soup
Preparation Time: 10 minutes Cooking Time: 40 minutes Total Duration: 50 minutes Servings: 6
All the delicious flavors of chicken parmesan in a delightful soup!
ingredients
- 2 tablespoons butter
- 1/2 cup (panko) breadcrumbs (gluten-free for gluten-free)
- 1/2 teaspoon garlic powder
- 1 tablespoon oil
- 1 pound boneless, skinless chicken breasts (or thighs), diced
- 1 onion, chopped
- 3 cloves garlic, minced
- 1/2 teaspoon red pepper flakes (optional)
- 4 cups chicken broth (link)
- 2 cups marinara sauce (link)
- 1 teaspoon Italian seasoning (link) (or oregano)
- 8 ounces pasta (gluten-free for gluten-free)
- 1/2 cup grated parmigiano reggiano (parmesan cheese)
- salt and pepper as desired
- 1 cup shredded mozzarella
- 1 tablespoon chopped basil (or parsley)
For the breadcrumbs:
For the chicken parmesan soup:
directions
- In a small pan, melt the butter, add the breadcrumbs and garlic powder, stir well, and cook until lightly golden brown before removing from heat.
- In a large saucepan, heat the oil over medium heat, add the chicken and onion, and cook for about 10 minutes.
- Stir in the garlic and red pepper flakes, cooking until aromatic, around a minute.
- Incorporate the broth, marinara sauce, Italian seasoning, and pasta, bring to a boil, then lower the heat and let simmer until the pasta is al dente, approximately 10 minutes, stirring occasionally.
- Stir in the parmesan, allowing it to melt into the broth.
- Adjust seasoning with salt and pepper to your liking.
- Pour the soup into oven-safe bowls, top with mozzarella, and broil until the cheese is melted, roughly 2 minutes.
- Top with the garlic butter breadcrumbs and basil and savor!
For the breadcrumbs:
For the chicken parmesan soup:
Option: Any type of breadcrumbs can be used, I prefer panko!
Option: Include 1/2 teaspoon ground fennel seeds with the garlic.
How to Create DIY Hot Chocolate Bombs
# It’s Hot Cocoa Bombs Time!
It’s incredibly adorable and enjoyable, and you can create SO many flavor variations! While cocoa bombs can be found in stores, crafting your own at home provides opportunities for personalization and imaginative flair. To begin, ensure you acquire the appropriate molds before it’s too late.
## What is a Cocoa Bomb?
Hot cocoa bombs, or hot chocolate spheres, are charming chocolate orbs filled with cocoa mix and marshmallows. When you pour hot milk over them, the chocolate dissolves, unveiling the marshmallows and cocoa within, leading to a tasty cup of hot cocoa.
## What You Require to Create Homemade Cocoa Bombs
### Ingredients:
– Chocolate chips or melting chocolate
– Hot cocoa mix
– Mini marshmallows
– Optional: Flavorings or toppings (like crushed cookies, candy canes, etc.)
### Equipment:
– Silicone half-sphere molds (preferably 2 inches in size)
– Microwave-safe bowl
– Spoon or pastry brush
– Microwave or double boiler
## Steps to Create Homemade Cocoa Bombs
1. **Melt Your Chocolate**: Use the microwave to melt chocolate chips or melting chocolate, stirring periodically until smooth.
2. **Fill the Molds**: Scoop melted chocolate into the molds, utilizing a spoon or pastry brush to coat the sides thoroughly. Freeze for 5-10 minutes to solidify.
3. **Extract the Chocolate from the Molds**: Carefully push the chocolate halves out from the silicone mold.
4. **Melt the Edges**: Warm a microwave-safe plate for a minute. Place an empty half of the cocoa bomb on the heated plate for a few seconds to slightly melt the edge.
5. **Fill**: Add 1 tablespoon of cocoa mix and mini marshmallows to one half. Melt the edge of another half on the warm plate and press the two halves together to close.
6. **Decorate**: Drizzle with extra chocolate or add crushed cookies, candy, or sprinkles for embellishment.
If a mold isn’t available, wrap two eggs in plastic wrap, dip them in melted chocolate, and follow the same instructions.
## Flavor Options
### For Snowman Cocoa Bombs:
1. Melt white chocolate.
2. Create and fill the spheres as described above.
3. Seal and pipe on eyes and a mouth with melted chocolate, and add an orange candy melt for the nose.
### For Peppermint Cocoa Bombs:
1. Melt white chocolate.
2. Create and fill the spheres with peppermint cocoa mix.
3. Seal and drizzle with white chocolate, then sprinkle crushed candy canes on top.
## Success Tips
– **Selecting Molds**: A silicone half-sphere mold is ideal for easy release. Silicone molds are budget-friendly and easy to use.
– **High-Quality Chocolate**: Opt for chocolate with 65% or more cocoa for optimal flavor and melting properties. Couverture chocolate is also an excellent choice.
– **Tempering Chocolate**: Proper tempering of chocolate ensures it retains its shape and has a glossy finish. Melt chocolate with care, keeping it below 90°F.
– **Storing**: Keep hot cocoa bombs in an airtight container at room temperature. They can last a long time if prepared correctly.
## Troubleshooting
If your cocoa spheres consistently break, check:
– The melting method and if the chocolate was overheated.
– The thickness of the edges in the molds.
– The freezing duration.
## Conclusion
Cocoa bombs are a delightful and inventive way to savor a timeless winter treat. With countless flavor options and customization possibilities, they serve as a wonderful gift or a cozy indulgence for yourself. Enjoy crafting these scrumptious bombs and sharing them with friends and family!
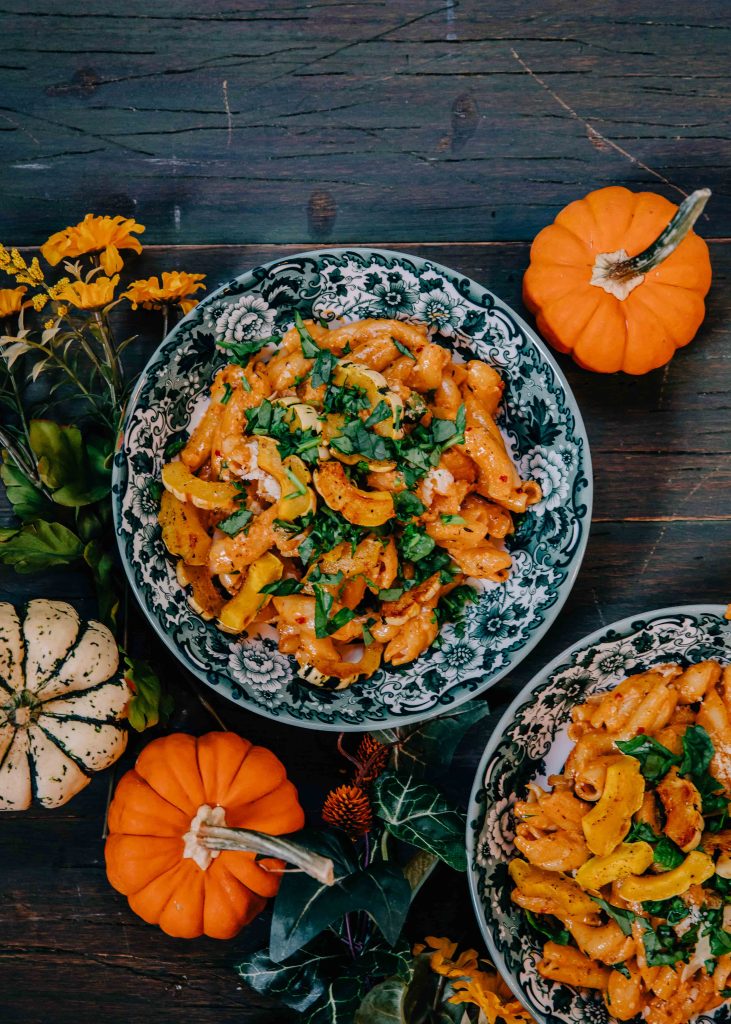
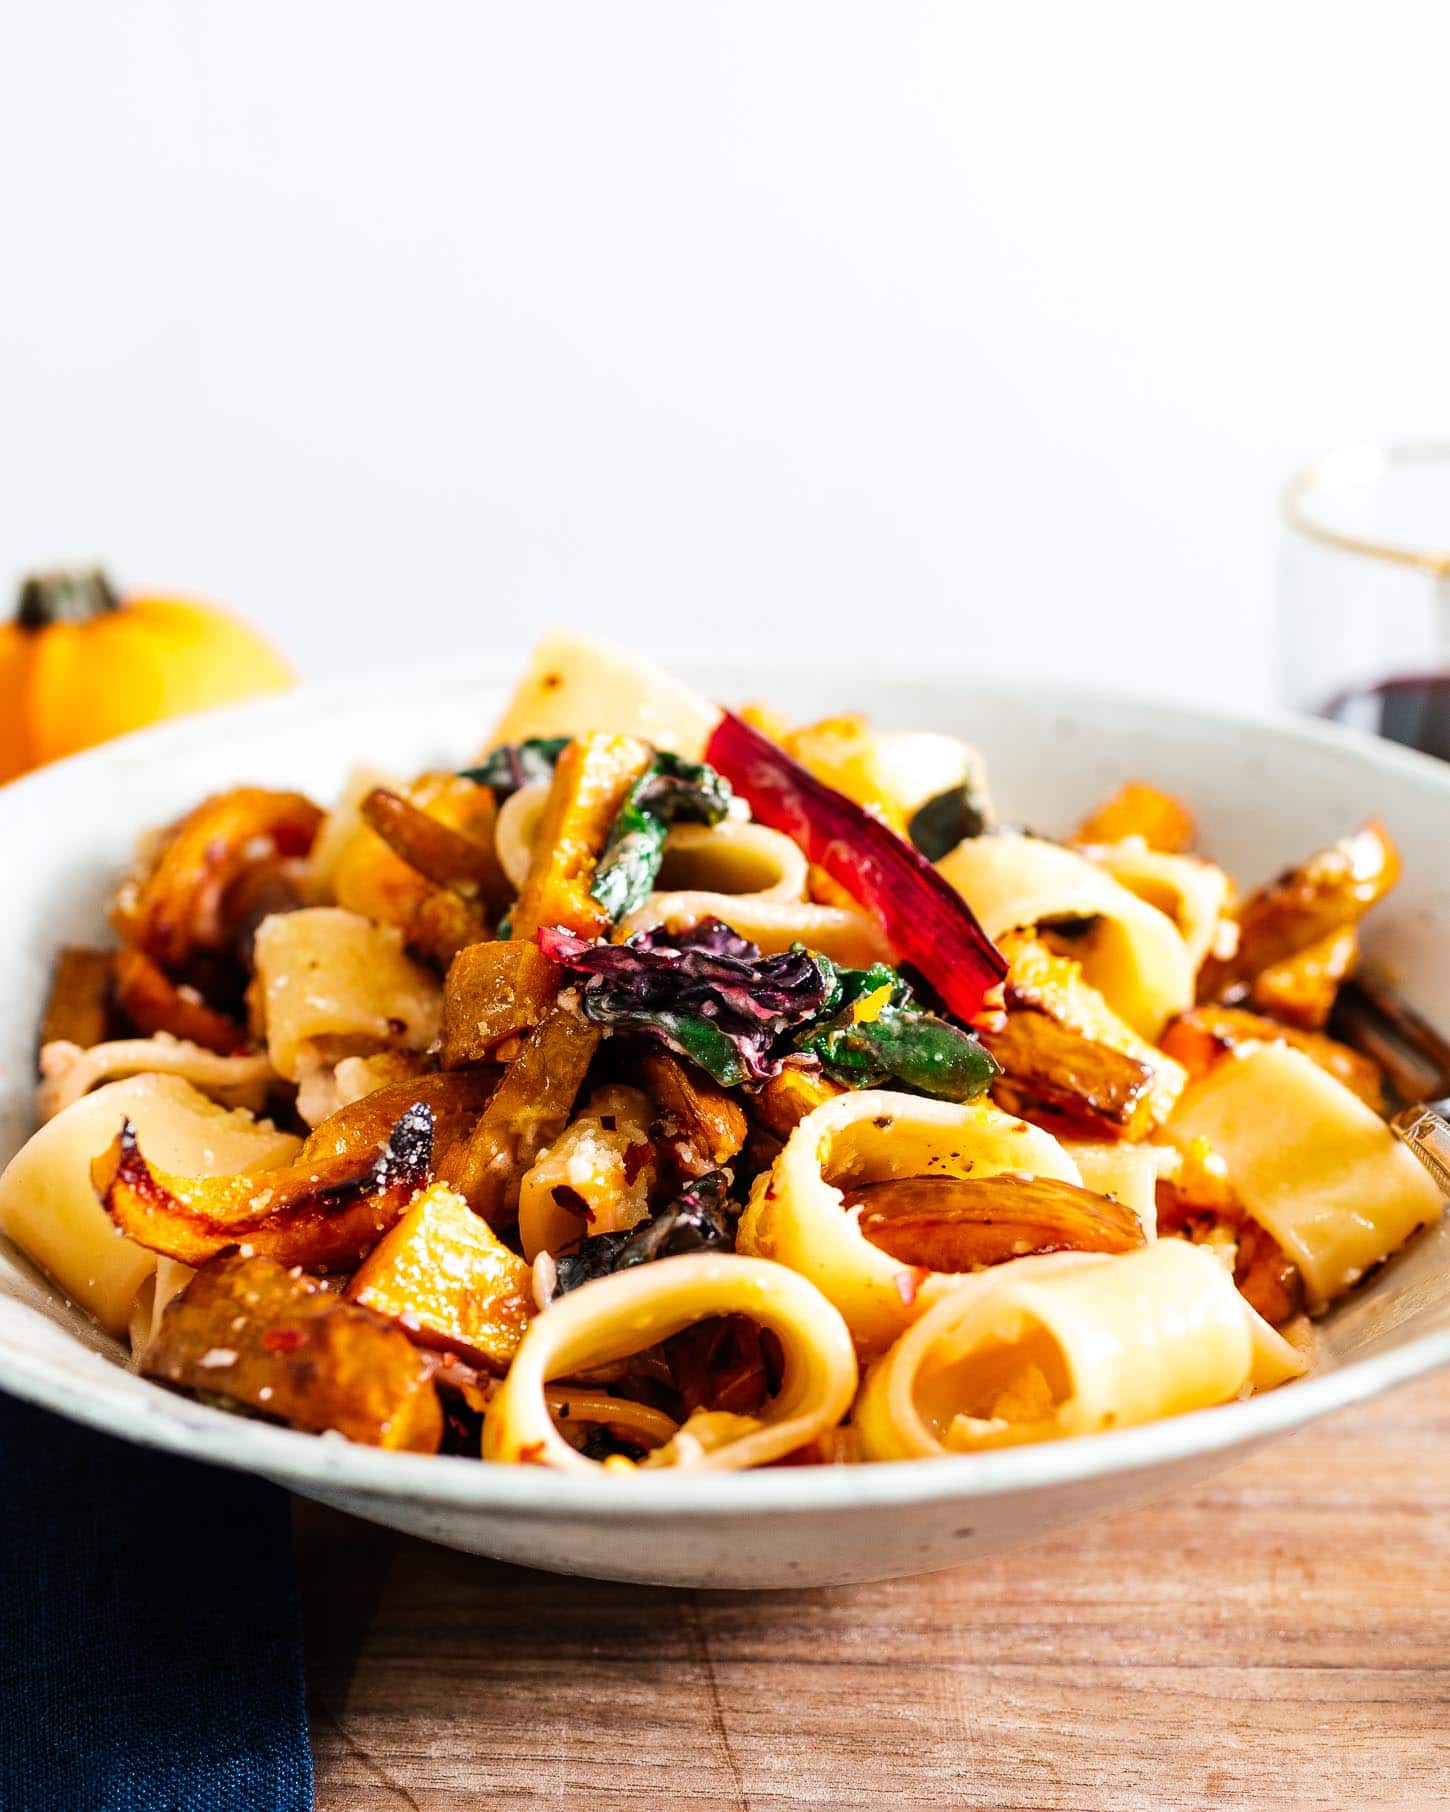
Creamy Pasta with Roasted Honeynut Squash
# It’s Honeynut Squash Season!
Recently, Mike and I explored the farmer’s market and came across a charming basket brimming with the tiniest honeynut squash. My enthusiasm was undeniable as I selected the most adorable little ones. For those who might not know, honeynut squash are small varieties of butternut squash, crafted to be both petite and scrumptious. They offer a sweeter flavor and, when roasted, they achieve a rich, caramel-like, malty essence. Their small size makes them exceptionally tender and quick to cook.
## A Fall Inspired Pasta
After roasting a few honeynut squash and savoring them on their own, I decided to whip up a cozy, fall-themed pasta dish. I cut the squash into thick matchsticks and pan-roasted them in a generous drizzle of olive oil until they were blistered and caramelized. Next, I made a simple cream sauce, tossed in some greens, and combined it all with pasta. The outcome was a warm, satisfying bowl of goodness, ideal for the season!

## Why You Should Make a Squash Pasta:
– You adore fall and wish to relish a cozy bowl of pasta with squash.
– You’re aiming to serve delicious vegetarian fare.
– The idea of honeynut squash thrills you.
– You desire a hearty yet somewhat healthy pasta meal.
– You love garlic cream sauce.
## Frequently Asked Questions
**Q:** I can’t locate honeynut squash at the store; what alternatives exist?
**A:** Any squash will suffice, such as butternut or kabocha. Just chop it smaller to ensure it cooks quickly in the pan.
**Q:** Why does the pasta appear pink?
**A:** I was taken aback to discover that Swiss chard turned the cream sauce pink! In the future, I would choose kale or another green.
**Q:** What’s the name of the pasta shape?
**A:** It’s called calamarata, one of my favored pasta shapes that resembles calamari rings.
**Q:** Why are you acting as if people pose these questions?
**A:** I find this format entertaining and appreciate the humor in it!
Happy honeynutting! (That sounds off, LOL)
xoxo, Steph
P.S. If you adore honeynut squash as I do, try this [honeynut squash with honeyed walnuts](https://iamafoodblog.com/how-to-roast-honeynut-squash-honeynut-squash-with-honeyed-walnuts/) I created last year!
## Recipe: Pan-Roasted Honeynut Squash with Creamy Garlicky Pasta
### Description
A warm and soothing pasta creation infused with all the flavors of fall, featuring honeynut squash.
### Prep Time
10 minutes
### Cook Time
30 minutes
### Total Time
40 minutes
### Ingredients
– 1-2 small honeynut squash (sliced into thick matchsticks)
– 2 tbsp olive or neutral oil
– Salt and freshly ground pepper
– 6 ounces dried pasta of your choice
– 1 1/2 cups leafy greens (chopped)
– 3/4 cup heavy cream
– 4 cloves garlic (minced or crushed)
– 3/4 cup finely grated parmesan
### Instructions
1. In a skillet, heat the oil over medium-high heat. Add the honeynut cubes in a single layer and sear, stirring occasionally, for 5 minutes. Reduce the heat to medium and cook until fork-tender, about 5-6 minutes. Season with salt and pepper.
2. In the meantime, cook the pasta 2 minutes shy of al dente in a large pot of salted water. Save 3/4 cup of pasta water and drain the rest.
3. Once the squash is ready, remove it from the pan and set aside. Add the cream and garlic to the same pan over medium heat and simmer until slightly reduced, about 2-3 minutes.
4. Combine the pasta and 1/2 cup of pasta water with the sauce and bring to a boil, stirring occasionally until the pasta is al dente and the sauce clings to the pasta, about 2 minutes. Add more pasta water if the sauce becomes too thick.
5. Stir in the greens until wilted, then lower the heat and blend in the cheese until melted.
6. Incorporate the honeynut squash, season with salt and pepper, and enjoy immediately!

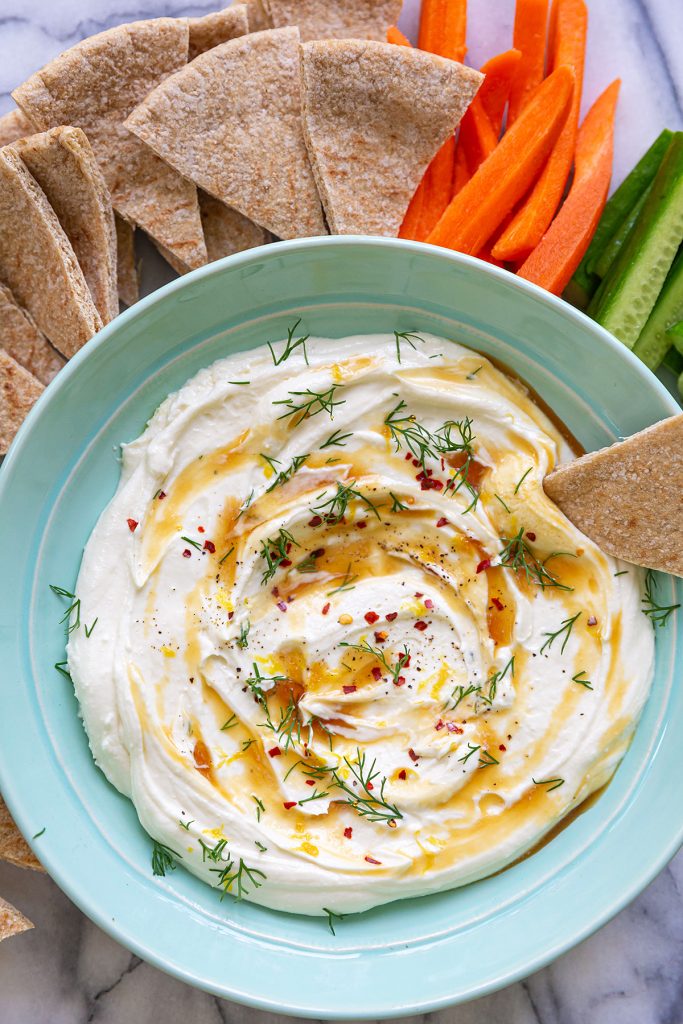
Fast and Simple Whipped Feta with Spicy Honey Recipe
**Simple and Swift Whipped Feta with Spicy Honey Recipe**
Whipped feta with spicy honey is a scrumptious and adaptable dish that merges the rich, tangy flavors of feta cheese with the sweet and fiery essence of spicy honey. This recipe is ideal for a speedy appetizer, a tasty sandwich spread, or an intriguing enhancement to a cheese board. Here’s how to create this easy yet striking dish.
**Ingredients:**
– 8 oz (225g) block of feta cheese, crumbled
– 4 oz (115g) cream cheese, softened
– 2 tablespoons olive oil
– 1 tablespoon lemon juice
– 1 teaspoon lemon zest
– Salt and pepper to taste
**For the Spicy Honey:**
– 1/2 cup (120ml) honey
– 1-2 teaspoons red pepper flakes (adjust to your preference)
– 1 tablespoon apple cider vinegar
**Instructions:**
1. **Prepare the Whipped Feta:**
– In a food processor, mix the crumbled feta cheese and softened cream cheese. Process until the mixture is smooth and creamy.
– Incorporate the olive oil, lemon juice, and lemon zest into the mixture. Blend again until everything is thoroughly combined and the mixture is airy and fluffy.
– Season with salt and pepper according to your taste. Use caution with the salt, as feta can be quite salty.
2. **Make the Spicy Honey:**
– In a small saucepan, mix the honey and red pepper flakes. Heat over low heat, stirring periodically, until the honey is warmed and the flavors meld, around 5 minutes.
– Take off the heat and mix in the apple cider vinegar. Let the spicy honey cool slightly.
3. **Assemble and Serve:**
– Spoon the whipped feta into a serving bowl, creating a small indentation in the center.
– Drizzle the spicy honey over the whipped feta, allowing it to pool in the indentation and drip down the sides.
– Pair with warm pita bread, crispy baguette slices, or fresh vegetables for dipping.
**Tips:**
– For a creamier consistency, ensure the cream cheese is at room temperature before blending.
– Tailor the heat level in the spicy honey by adjusting the quantity of red pepper flakes.
– Store any remaining whipped feta in an airtight container in the fridge for up to three days. Gently reheat the spicy honey before serving.
This simple and swift whipped feta with spicy honey recipe is destined to become a favorite. Its blend of creamy, tangy, sweet, and spicy flavors makes it a standout dish for any event. Enjoy exploring this recipe and adding your own flair!
Read More
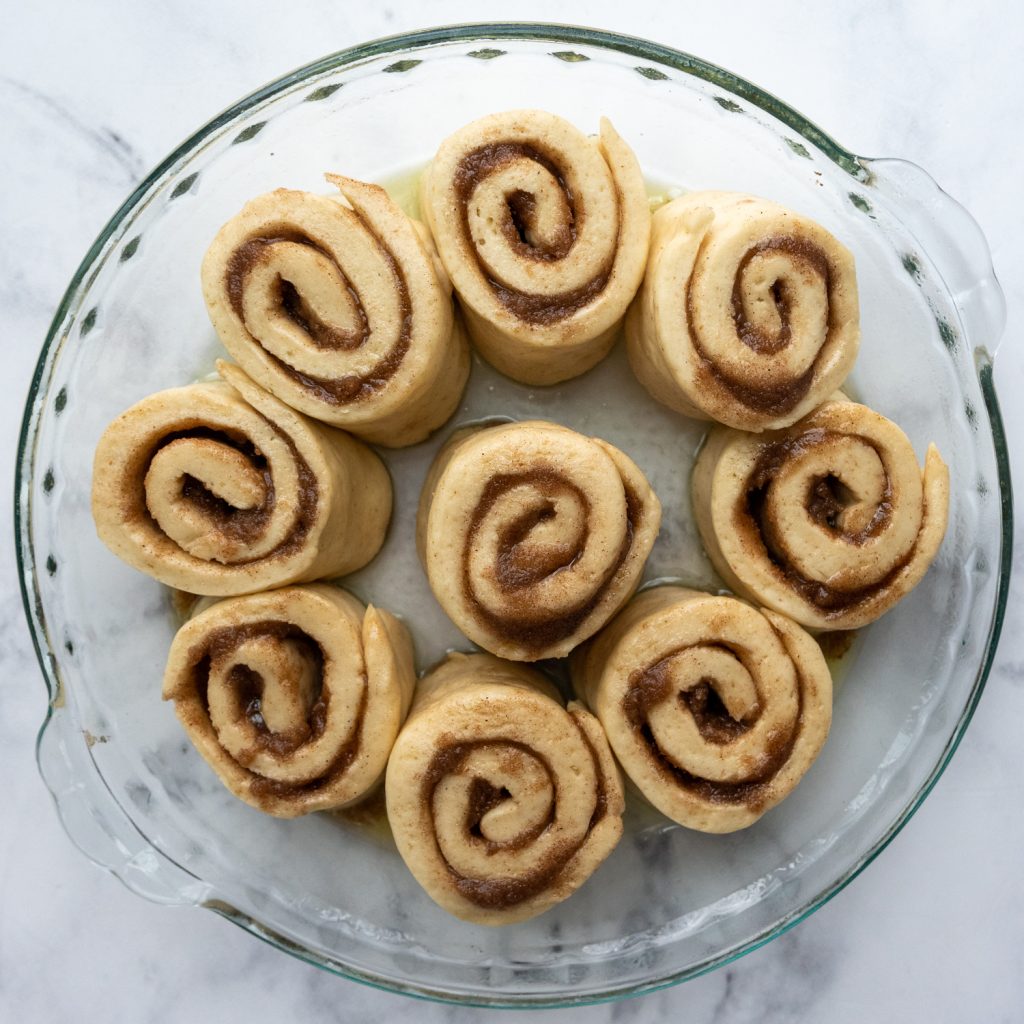
The Definitive Formula for Homemade Cinnamon Buns
# Soft and Tasty Cinnamon Rolls Recipe
This recipe for cinnamon rolls results in rolls that are soft and tasty. The tender dough is filled with sweet cinnamon sugar, rolled up, and baked to perfection. Finished with a cream cheese frosting, these rolls deliver the ideal bite!
## Overview
While they require a bit of time, homemade cinnamon rolls are simple to prepare, so don’t feel daunted by the yeast.
### Flavor
Tender, fluffy dough is filled with brown sugar and cinnamon for a sweet, gooey center and gently golden buttery edges.
### Recommended Tools
A stand mixer simplifies kneading, but the dough can also be combined by hand or in a bread machine.
### Yield
Produces 15 generously sized rolls, ideal for sharing.
### Serving Suggestions
Enjoy these for a special breakfast with complementary dishes like an overnight breakfast casserole.
### Freezing
Freeze baked rolls prior to frosting. Reheat them in the microwave for warm and soft cinnamon rolls anytime.
## Ingredient Notes
– **Yeast**: Make sure the yeast becomes foamy in step 2; otherwise, the buns won’t rise. Instant yeast has not been tested in this recipe.
– **Dairy**: Whole milk and butter contribute richness and keep the dough tender. If using salted butter, lower the salt in the dough.
– **All-purpose flour**: Employ the spoon and level technique to prevent dense rolls. Bread flour can be used for even softer rolls.
– **Cinnamon Sugar Filling**: The filling is a blend of brown sugar and ground cinnamon. Either dark or light brown sugar can be used.
## How to Make Cinnamon Rolls
1. **Proof the yeast**: Mix the yeast with warm water and sugar. The blend should become foamy.
2. **Prepare the dough**: Heat the milk and butter in a separate bowl. Incorporate the remaining dough ingredients, including the yeast mixture, and knead until smooth.
3. **Rise**: Place the dough in a warm area for about an hour or until it has doubled in size.
4. **Add filling**: Roll the dough into a rectangle, spread with butter, and dust with cinnamon and brown sugar. Re-roll the dough and slice it.
5. **Bake**: Arrange the rolls in a prepared baking pan and bake until golden brown.
Savor! Once the rolls are fully baked, allow them to cool before serving. Remember the cream cheese frosting!
### Pro Tips for Perfect Rolls
– Ensure all ingredients are at room temperature.
– If the yeast does not foam, substitute it with fresh yeast.
– Add flour gradually; using less flour helps achieve softer rolls.
– If your kitchen is cool, allow the dough to rise near a warm oven.
– Lightly cover the dough with a kitchen towel while it rises.
– If the rolls brown too quickly, loosely cover them with foil.
### Make Ahead Instructions
1. Cover the prepared cinnamon rolls in a greased 9×13-inch dish with plastic wrap and refrigerate for up to 24 hours.
2. When ready to bake, take the rolls out of the fridge and remove the plastic wrap. With the oven off, cover the rolls with a clean kitchen towel and place a bowl of very hot water in the oven for the first rise.
3. To bake, take the rolls out of the oven (leave the water inside) and preheat the oven to the recommended temperature. The hot water will create steam, keeping the rolls soft and fluffy during baking.
4. Bake according to the recipe instructions.
### Storage and Leftovers
– Store baked cinnamon rolls in an airtight container at room temperature for up to 2 days or refrigerate for up to 4 days.
– Microwave individual rolls for 10 to 15 seconds to soften.
– To freeze, omit the frosting, wrap baked and cooled rolls securely, and place them in the freezer for up to 2 months. Thaw at room temperature and frost just before serving.
### Nutrition Information (per roll)
– **Calories**: 398
– **Carbohydrates**: 57g
– **Protein**: 5g
– **Fat**: 17g
– **Saturated Fat**: 10g
– **Cholesterol**: 66mg
– **Sodium**: 141mg
– **Fiber**: 2g
– **Sugar**: 31g
Relish these cinnamon rolls for a cozy brunch or a special celebration!
Read More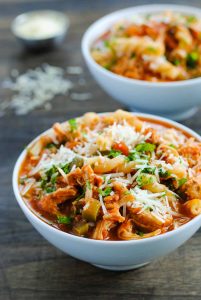
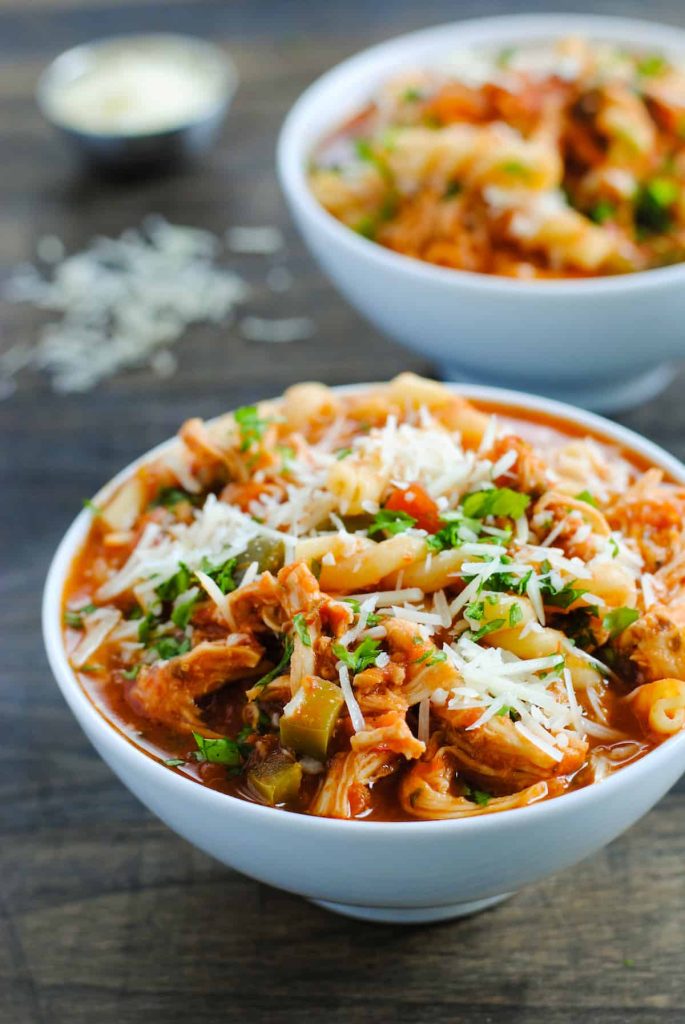
Robust Chicken Parmesan Soup Recipe
Chicken Parmesan Soup
Preparation Time: 10 minutes Cooking Time: 40 minutes Total Duration: 50 minutes Servings: 6
All the delicious flavors of chicken parmesan in a delightful soup!
ingredients
- 2 tablespoons butter
- 1/2 cup (panko) breadcrumbs (gluten-free for gluten-free)
- 1/2 teaspoon garlic powder
- 1 tablespoon oil
- 1 pound boneless, skinless chicken breasts (or thighs), diced
- 1 onion, chopped
- 3 cloves garlic, minced
- 1/2 teaspoon red pepper flakes (optional)
- 4 cups chicken broth (link)
- 2 cups marinara sauce (link)
- 1 teaspoon Italian seasoning (link) (or oregano)
- 8 ounces pasta (gluten-free for gluten-free)
- 1/2 cup grated parmigiano reggiano (parmesan cheese)
- salt and pepper as desired
- 1 cup shredded mozzarella
- 1 tablespoon chopped basil (or parsley)
For the breadcrumbs:
For the chicken parmesan soup:
directions
- In a small pan, melt the butter, add the breadcrumbs and garlic powder, stir well, and cook until lightly golden brown before removing from heat.
- In a large saucepan, heat the oil over medium heat, add the chicken and onion, and cook for about 10 minutes.
- Stir in the garlic and red pepper flakes, cooking until aromatic, around a minute.
- Incorporate the broth, marinara sauce, Italian seasoning, and pasta, bring to a boil, then lower the heat and let simmer until the pasta is al dente, approximately 10 minutes, stirring occasionally.
- Stir in the parmesan, allowing it to melt into the broth.
- Adjust seasoning with salt and pepper to your liking.
- Pour the soup into oven-safe bowls, top with mozzarella, and broil until the cheese is melted, roughly 2 minutes.
- Top with the garlic butter breadcrumbs and basil and savor!
For the breadcrumbs:
For the chicken parmesan soup:
Option: Any type of breadcrumbs can be used, I prefer panko!
Option: Include 1/2 teaspoon ground fennel seeds with the garlic.

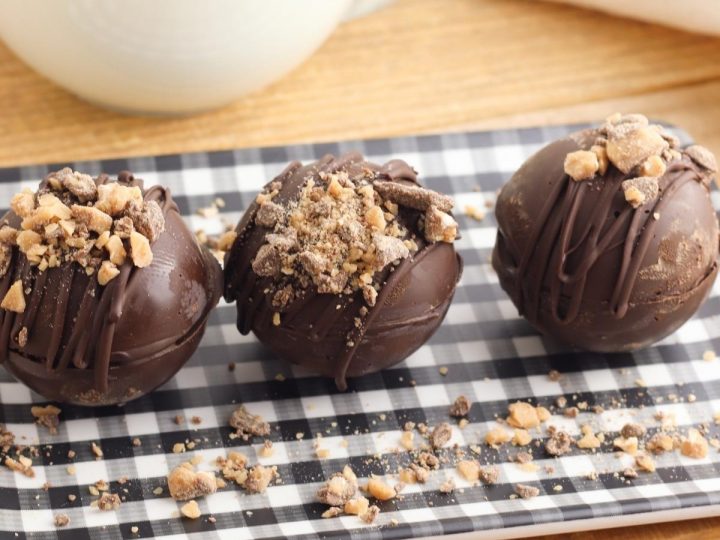
How to Create DIY Hot Chocolate Bombs
# It’s Hot Cocoa Bombs Time!
It’s incredibly adorable and enjoyable, and you can create SO many flavor variations! While cocoa bombs can be found in stores, crafting your own at home provides opportunities for personalization and imaginative flair. To begin, ensure you acquire the appropriate molds before it’s too late.
## What is a Cocoa Bomb?
Hot cocoa bombs, or hot chocolate spheres, are charming chocolate orbs filled with cocoa mix and marshmallows. When you pour hot milk over them, the chocolate dissolves, unveiling the marshmallows and cocoa within, leading to a tasty cup of hot cocoa.
## What You Require to Create Homemade Cocoa Bombs
### Ingredients:
– Chocolate chips or melting chocolate
– Hot cocoa mix
– Mini marshmallows
– Optional: Flavorings or toppings (like crushed cookies, candy canes, etc.)
### Equipment:
– Silicone half-sphere molds (preferably 2 inches in size)
– Microwave-safe bowl
– Spoon or pastry brush
– Microwave or double boiler
## Steps to Create Homemade Cocoa Bombs
1. **Melt Your Chocolate**: Use the microwave to melt chocolate chips or melting chocolate, stirring periodically until smooth.
2. **Fill the Molds**: Scoop melted chocolate into the molds, utilizing a spoon or pastry brush to coat the sides thoroughly. Freeze for 5-10 minutes to solidify.
3. **Extract the Chocolate from the Molds**: Carefully push the chocolate halves out from the silicone mold.
4. **Melt the Edges**: Warm a microwave-safe plate for a minute. Place an empty half of the cocoa bomb on the heated plate for a few seconds to slightly melt the edge.
5. **Fill**: Add 1 tablespoon of cocoa mix and mini marshmallows to one half. Melt the edge of another half on the warm plate and press the two halves together to close.
6. **Decorate**: Drizzle with extra chocolate or add crushed cookies, candy, or sprinkles for embellishment.
If a mold isn’t available, wrap two eggs in plastic wrap, dip them in melted chocolate, and follow the same instructions.
## Flavor Options
### For Snowman Cocoa Bombs:
1. Melt white chocolate.
2. Create and fill the spheres as described above.
3. Seal and pipe on eyes and a mouth with melted chocolate, and add an orange candy melt for the nose.
### For Peppermint Cocoa Bombs:
1. Melt white chocolate.
2. Create and fill the spheres with peppermint cocoa mix.
3. Seal and drizzle with white chocolate, then sprinkle crushed candy canes on top.
## Success Tips
– **Selecting Molds**: A silicone half-sphere mold is ideal for easy release. Silicone molds are budget-friendly and easy to use.
– **High-Quality Chocolate**: Opt for chocolate with 65% or more cocoa for optimal flavor and melting properties. Couverture chocolate is also an excellent choice.
– **Tempering Chocolate**: Proper tempering of chocolate ensures it retains its shape and has a glossy finish. Melt chocolate with care, keeping it below 90°F.
– **Storing**: Keep hot cocoa bombs in an airtight container at room temperature. They can last a long time if prepared correctly.
## Troubleshooting
If your cocoa spheres consistently break, check:
– The melting method and if the chocolate was overheated.
– The thickness of the edges in the molds.
– The freezing duration.
## Conclusion
Cocoa bombs are a delightful and inventive way to savor a timeless winter treat. With countless flavor options and customization possibilities, they serve as a wonderful gift or a cozy indulgence for yourself. Enjoy crafting these scrumptious bombs and sharing them with friends and family!
Read More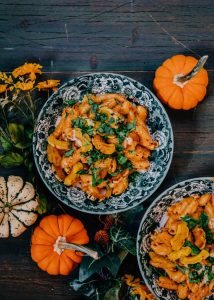
Creamy Pasta with Roasted Honeynut Squash
# It’s Honeynut Squash Season!
Recently, Mike and I explored the farmer’s market and came across a charming basket brimming with the tiniest honeynut squash. My enthusiasm was undeniable as I selected the most adorable little ones. For those who might not know, honeynut squash are small varieties of butternut squash, crafted to be both petite and scrumptious. They offer a sweeter flavor and, when roasted, they achieve a rich, caramel-like, malty essence. Their small size makes them exceptionally tender and quick to cook.
## A Fall Inspired Pasta
After roasting a few honeynut squash and savoring them on their own, I decided to whip up a cozy, fall-themed pasta dish. I cut the squash into thick matchsticks and pan-roasted them in a generous drizzle of olive oil until they were blistered and caramelized. Next, I made a simple cream sauce, tossed in some greens, and combined it all with pasta. The outcome was a warm, satisfying bowl of goodness, ideal for the season!

## Why You Should Make a Squash Pasta:
– You adore fall and wish to relish a cozy bowl of pasta with squash.
– You’re aiming to serve delicious vegetarian fare.
– The idea of honeynut squash thrills you.
– You desire a hearty yet somewhat healthy pasta meal.
– You love garlic cream sauce.
## Frequently Asked Questions
**Q:** I can’t locate honeynut squash at the store; what alternatives exist?
**A:** Any squash will suffice, such as butternut or kabocha. Just chop it smaller to ensure it cooks quickly in the pan.
**Q:** Why does the pasta appear pink?
**A:** I was taken aback to discover that Swiss chard turned the cream sauce pink! In the future, I would choose kale or another green.
**Q:** What’s the name of the pasta shape?
**A:** It’s called calamarata, one of my favored pasta shapes that resembles calamari rings.
**Q:** Why are you acting as if people pose these questions?
**A:** I find this format entertaining and appreciate the humor in it!

Happy honeynutting! (That sounds off, LOL)
xoxo, Steph
P.S. If you adore honeynut squash as I do, try this [honeynut squash with honeyed walnuts](https://iamafoodblog.com/how-to-roast-honeynut-squash-honeynut-squash-with-honeyed-walnuts/) I created last year!
## Recipe: Pan-Roasted Honeynut Squash with Creamy Garlicky Pasta
### Description
A warm and soothing pasta creation infused with all the flavors of fall, featuring honeynut squash.
### Prep Time
10 minutes
### Cook Time
30 minutes
### Total Time
40 minutes
### Ingredients
– 1-2 small honeynut squash (sliced into thick matchsticks)
– 2 tbsp olive or neutral oil
– Salt and freshly ground pepper
– 6 ounces dried pasta of your choice
– 1 1/2 cups leafy greens (chopped)
– 3/4 cup heavy cream
– 4 cloves garlic (minced or crushed)
– 3/4 cup finely grated parmesan
### Instructions
1. In a skillet, heat the oil over medium-high heat. Add the honeynut cubes in a single layer and sear, stirring occasionally, for 5 minutes. Reduce the heat to medium and cook until fork-tender, about 5-6 minutes. Season with salt and pepper.
2. In the meantime, cook the pasta 2 minutes shy of al dente in a large pot of salted water. Save 3/4 cup of pasta water and drain the rest.
3. Once the squash is ready, remove it from the pan and set aside. Add the cream and garlic to the same pan over medium heat and simmer until slightly reduced, about 2-3 minutes.
4. Combine the pasta and 1/2 cup of pasta water with the sauce and bring to a boil, stirring occasionally until the pasta is al dente and the sauce clings to the pasta, about 2 minutes. Add more pasta water if the sauce becomes too thick.
5. Stir in the greens until wilted, then lower the heat and blend in the cheese until melted.
6. Incorporate the honeynut squash, season with salt and pepper, and enjoy immediately!

Swedish Meatballs in a Rich Sauce (No Heavy Cream)
**Swedish Meatballs with a Creamy Sauce (Without Heavy Cream)**
Swedish meatballs, referred to as “köttbullar” in Sweden, are a cherished dish that has achieved worldwide recognition for their comforting flavor and luxurious, creamy sauce. Typically accompanied by lingonberry jam and potatoes, these meatballs are a fundamental part of Swedish gastronomy. Although the traditional recipe usually includes heavy cream for the sauce, there are multiple alternatives to achieve a similar creamy consistency and flavor without it. Here’s how to relish Swedish meatballs with a creamy sauce, without heavy cream.
**Ingredients for Swedish Meatballs:**
– 1 pound ground beef
– 1/2 pound ground pork
– 1/2 cup breadcrumbs
– 1/4 cup milk (or a non-dairy option)
– 1 egg
– 1 small onion, finely diced
– 1 teaspoon salt
– 1/2 teaspoon black pepper
– 1/4 teaspoon ground allspice
– 1/4 teaspoon ground nutmeg
– 2 tablespoons butter or oil for cooking
**Ingredients for Creamy Sauce:**
– 2 tablespoons butter
– 2 tablespoons all-purpose flour
– 2 cups beef broth
– 1 cup milk (or a non-dairy option)
– 1 tablespoon soy sauce
– 1 teaspoon Dijon mustard
– Salt and pepper to taste
**Instructions:**
1. **Prepare the Meatballs:**
– In a large bowl, mix the breadcrumbs and milk. Allow them to soak for a few minutes until the breadcrumbs become soft.
– Incorporate the ground beef, ground pork, egg, diced onion, salt, pepper, allspice, and nutmeg into the breadcrumb mixture. Combine thoroughly.
– Form the mixture into small meatballs, approximately 1 inch in size.
2. **Cook the Meatballs:**
– In a large skillet, warm the butter or oil over medium heat. Introduce the meatballs in batches, avoiding overcrowding the pan.
– Cook the meatballs until they are golden brown on all sides and fully cooked, about 8-10 minutes. Take them out of the skillet and set aside.
3. **Make the Creamy Sauce:**
– In the same skillet, melt 2 tablespoons of butter over medium heat.
– Stir in the flour and cook for 1-2 minutes, until it forms a paste and acquires a golden color.
– Gradually whisk in the beef broth, ensuring to eliminate any lumps.
– Incorporate the milk, soy sauce, and Dijon mustard, whisking constantly until the sauce thickens.
– Adjust seasoning with salt and pepper to taste.
4. **Combine and Serve:**
– Place the meatballs back into the skillet, coating them with the creamy sauce. Simmer for a few minutes to warm through.
– Serve the Swedish meatballs alongside mashed potatoes or egg noodles, with a side of lingonberry jam for an authentic experience.
**Tips for a Creamy Sauce Without Heavy Cream:**
– **Milk and Flour:** Employing milk mixed with a roux (butter and flour blend) can effectively thicken the sauce without needing heavy cream.
– **Non-Dairy Alternatives:** For a dairy-free option, replace milk with almond milk, oat milk, or coconut milk. Each provides a slightly different taste, so select according to your flavor preference.
– **Soy Sauce and Mustard:** These components enhance depth and umami in the sauce, offsetting the richness usually given by heavy cream.
By adhering to this recipe, you can savor the authentic flavor of Swedish meatballs with a creamy sauce that is both delectable and lighter on dairy. Whether for a family meal or a special event, this dish is bound to please.
Read More
Step-by-Step Instructions for Slicing Fennel
Curious about how to slice fennel but unsure of the proper technique? I enjoy this vegetable in a crisp fennel salad or as delicately roasted fennel. However, it can be a bit challenging to cut! Here’s my technique for slicing a fennel bulb, including instructions on how to both slice and dice this flavorful vegetable.
## How to Slice Fennel, Step-By-Step
**Step 1:** Snip off the fennel fronds using a large chef’s knife. (You can use the delicate parts as a garnish if you wish.)
**Step 2:** Trim off the root end of the fennel.
**Step 3:** Peel off any tough outer layers of the fennel and throw them away.
**Step 4:** Halve the fennel bulb by slicing down the middle.
**Step 5: To slice the fennel**, set the fennel on its cut side and create thin half-moon slices parallel to the root end using a circular motion.
**Step 6: To dice the fennel**, cut slices parallel to the root end, leaving a bit at the end to keep the slices connected. Make wider slices for diced and thinner for minced or finely diced. Rotate the fennel and slice in the opposite direction, following the curve. Once you’ve sliced halfway through, turn the fennel onto the flat cut side and keep slicing.
And that’s it: how to slice fennel in six simple steps! Share in the comments below if you try my slicing technique for fennel and how it works out for you.
## Tip: Use a high-quality chef’s knife!
A reliable knife can significantly enhance your efficiency in the kitchen. I’ve had my chef’s knives for more than 10 years, and they still perform wonderfully. My preferred knife is this 7″ Chef’s Knife. For safe storage, consider using a drawer knife organizer. Always keep your knives sharp by using a local service or a home knife sharpener.
## Fennel Recipes
As a cookbook author and recipe creator, I enjoy incorporating fennel into my dishes. Its licorice flavor adds depth to soups and stews, and it’s crunchy and invigorating when raw in salads.
While some may perceive the flavor as quite strong, I’ve noticed that even those who are typically not fond of fennel (like my Dad specifically!) adore my fennel salad with apple. Here are some of my favorite fennel recipes for you to explore:
## Frequently Asked Questions
**Should I remove the fennel stalks before slicing the bulb?**
Yes, the stalks should be removed prior to cutting the fennel bulb. The stalks are tough and fibrous, making them hard to consume raw. However, don’t toss them! The stalks can be utilized to create flavorful vegetable stock, and the feathery fronds can serve as a garnish or be added to salads.
**Is it safe to eat fennel raw?**
Absolutely, fennel can be appreciated raw. It boasts a crispy texture and a mildly sweet, licorice-like taste. Thinly sliced or shaved fennel is a tasty complement to salads or slaws.
**What’s the best way to store cut fennel?**
Keep cut fennel in an airtight container in the refrigerator. It should last for 3-5 days. To inhibit browning, you might sprinkle a bit of lemon juice over the cut fennel before storing.

25 Tasty Recipes Featuring Ripe Bananas
Alex & Sonja: The Energetic Pair Behind A Couple Cooks
Introducing Alex and Sonja Overhiser, the imaginative forces and culinary aficionados steering the popular food blog, A Couple Cooks. As the creators of two celebrated cookbooks, they have established a unique spot in the realm of home cooking by showcasing their enthusiasm for uncomplicated, seasonal dishes. Their adventure started in 2010 when they unveiled A Couple Cooks, a space devoted to spreading the joy of cooking across households globally.
Alex and Sonja are not only partners in the culinary world but also in life. As busy parents, they grasp the difficulties of crafting nutritious and delectable meals while juggling a tight schedule. This real-life couple has refined the skill of cooking in tandem, transforming daily meal prep into a fun and cooperative experience. Their blog is proof of their conviction that cooking can be enjoyable and rewarding, even for those with limited time.
Through the years, A Couple Cooks has evolved into a thorough resource for food enthusiasts, providing thousands of original recipes that accommodate a wide array of tastes and dietary needs. From swift weeknight meals to extravagant weekend gatherings, Alex and Sonja deliver inspiration for every event. Their recipes are marked by simplicity and a focus on fresh, seasonal produce, making them approachable for cooks of all abilities.
Alongside recipes, Alex and Sonja share a rich variety of cooking tips and meal planning strategies, assisting their audience in navigating the often daunting world of home cooking. Their achievable guidance aims to empower readers to explore the kitchen and enhance their culinary talents. Each recipe is carefully crafted and photographed by the pair, guaranteeing that readers have an easy-to-follow and visually engaging reference.
Their dedication to quality and authenticity transcends their blog. Alex and Sonja’s cookbooks have garnered positive responses from both critics and home cooks, further solidifying their status as esteemed voices within the food community. Their work reflects not only their culinary proficiency but also their commitment to cultivating a love for cooking in others.
As they persist in inspiring and educating through A Couple Cooks, Alex and Sonja remain devoted to sharing the pleasures of cooking with their audience. Their journey exemplifies the power of food to unite people, and their narrative acts as an inspiration to aspiring cooks and food lovers everywhere.
Read More
Easy and Tasty Banana Bread Recipe
This simple banana bread recipe yields the most moist and flavorful loaf using just one bowl and common ingredients from your pantry: no mixer needed!
My family consumes a lot of bananas, so there are often a few overripe blackened ones hiding in my fruit bowl at that ideal stage of sweetness. This hassle-free banana bread recipe is perfect for those brown and black bananas, as it requires minimal effort to prepare!
It demands no unique ingredients and no mixer: you can whip it up using just a single bowl. I’ve also created numerous fun variations, allowing you to reinvent it regularly!
Reasons to Love This Recipe
I’ve shared several banana bread recipes (here are my top 10 picks). However, this is my favorite classic, straightforward method. Here’s what makes it special:
– Super easy: No stand mixer, no complicated techniques: just a bowl and a wooden spoon.
– Delicious taste: Melted butter delivers a rich, cake-like consistency. The vanilla and cinnamon add warm undertones, and the sweetness is just right.
– Easy to adapt: Stick with the basic recipe, or switch things up with brown butter, chocolate chips, or a glaze.
How to Create Easy Banana Bread
This banana bread recipe is very straightforward. Here’s a summary of the basic steps:
1. Line your loaf pan with parchment paper that goes up two sides. This helps with lifting the loaf out later.
2. Begin by mashing the bananas directly in my mixing bowl, whisk in the eggs, and then add the sugar, melted butter, and vanilla.
3. Mix in the dry ingredients (flour, baking powder, salt, cinnamon). Be cautious not to overmix, as this can create holes in the crumb.
4. Bake the bread for 55 to 60 minutes, until the top bounces back when touched and the internal temperature reaches 200F.
Butter vs. Oil in Banana Bread
This recipe uses melted butter, but you can opt for a neutral oil if you prefer. Oil enhances the moisture and provides a slightly spongier texture. While I prefer butter for its richer taste, oil is great for a dairy-free option.
If you choose butter, you can also make brown butter banana bread, which is extra tasty! Preparing browned butter by cooking it for a few minutes until it achieves a golden brown color adds nutty caramel flavors that enhance this recipe.
Pan Size and Baking Duration
This recipe is suitable for both a 9 x 5″ and an 8 x 4″ loaf pan. If using the 8 x 4″ pan, you might need to extend the baking time by a few minutes.
The bread is finished when the top springs back lightly when pressed and a toothpick inserted in the center comes out with just a few moist crumbs.
Ways to Personalize Your Banana Bread
This basic recipe offers great versatility. I enjoy adding toasted pecans or walnuts for banana nut bread. You can also mix in chocolate chips into the batter, plus a few sprinkled on top before baking.
For a fruity twist, try mixing in blueberries like in my Blueberry Banana Bread. Coat 1½ cups of berries with a tablespoon of flour beforehand to keep them from sinking. Or explore my other variations:
You can also top it with cinnamon sugar: mix 2 tablespoons of sugar with ½ teaspoon of cinnamon and sprinkle over the batter before baking. Additionally, you can drizzle the bread (once cooled) with my Vanilla Glaze, Maple Glaze, or the salted caramel glaze found in my Brown Butter Banana Bread.
Serving Ideas
This simple banana bread, served warm with a spread of softened butter or peanut butter, is perfection. For breakfast, I love pairing it with scrambled eggs and fresh fruit. It also makes a fantastic afternoon snack alongside a latte or cappuccino.
For an indulgent brunch, consider preparing Banana Bread French Toast. Alternatively, serve warm slices with vanilla ice cream, a drizzle of salted caramel, and chopped pecans for a delightful dessert.
How to Preserve Banana Bread
Banana bread maintains its freshness for around 5 days at room temperature when tightly wrapped in aluminum foil. I sometimes keep it in the fridge, extending its life to about 10 days, though the texture may become slightly denser.
For longer-term storage, I slice the cooled bread, wrap individual pieces in plastic wrap, and store them in a freezer bag. Frozen banana bread remains good for up to 3 months. You can toast slices straight from frozen for a quick breakfast, or let them thaw at room temperature for 20 minutes.
Common Questions
Can I use frozen bananas for banana bread?
Absolutely! Peel and slice them before freezing, then fully thaw them before using. They will release quite a bit of liquid upon thawing, so be sure to incorporate that liquid into your batter as it provides concentrated banana flavor.
Why is my banana bread dense or gummy?
This is often due

Weekly Meal Schedule for December 22, 2025
### Receive Tasty New Recipes Every Day
In the hectic pace of modern life, carving out time for cooking can be difficult. Nonetheless, with the appropriate tools, you can easily uncover new and enticing recipes that will not only conserve your time but also improve your culinary abilities. Enrolling in a daily recipe service can revolutionize the experience for home cooks eager to expand their meal choices and keep things fresh in the kitchen.
#### Reasons to Sign Up for Daily Recipes
1. **Diversity**: Daily recipe subscriptions offer an extensive range of meal ideas, spanning from quick weeknight meals to fancy weekend banquets. This diversity can assist you in escaping the routine of repeatedly preparing the same dishes.
2. **Ease**: With recipes sent directly to your inbox, you can efficiently organize your meals for the week. This ease cuts down on time spent planning meals and shopping for ingredients.
3. **Creativity**: Daily recipes can motivate you to experiment with new ingredients and cooking methods that you may not have thought about before. This can elevate your culinary skills and expand your taste preferences.
4. **Nutritious Options**: Numerous recipe services emphasize healthy eating, offering wholesome choices that can assist you in sustaining a balanced diet. This is particularly advantageous for those wanting to enhance their eating habits.
5. **Community and Encouragement**: Subscribing to a recipe service frequently connects you with a community of other cooking enthusiasts. You can exchange tips, seek advice, and receive encouragement as you embark on new culinary journeys.
#### Getting Started
To begin enjoying delicious new recipes each day, think about signing up for a trustworthy recipe service. Here’s an easy guide to follow:
1. **Select a Service**: Investigate different recipe subscription services to find one that matches your dietary needs and cooking style. Seek out services that provide a variety of cuisines and meal options.
2. **Register**: Most services ask you to complete a straightforward form with your email and preferences. Some may also request dietary restrictions or favorite cuisines to customize the recipes to your liking.
3. **Monitor Your Inbox**: After subscribing, you’ll start receiving daily recipes directly to your email. Be sure to check your inbox frequently for fresh ideas.
4. **Try Out and Delight**: Use the recipes as a framework but feel free to adjust them to suit your preferences. Cooking is all about imagination, so don’t hold back on experimenting!
5. **Connect with the Community**: Many recipe services host social media groups or forums where you can share your experiences, ask for advice, and interact with fellow subscribers.
#### Final Thoughts
Subscribing to a daily recipe service is a fantastic way to elevate your cooking experience. With an assurance of new and appetizing recipes landing in your inbox, you’ll grow eager to cook and venture into the culinary realm. Whether you’re a beginner or an experienced chef, daily recipes can motivate you to craft meals that are not just fulfilling but also pleasurable to prepare. Begin your culinary adventure today and find the joy of cooking with fresh, new recipes each day!
Read More